gitlab · feature flags
Feature flags in a React app with GitLab's feature toggles
I’ve been taking a deeper look at GitLab’s full DevOps platform and their feature toggle offering caught my eye. This tool lets you configure and manage feature toggles directly from the GitLab UI. In the past I have looked at services like LaunchDarkly or Firebase’s A/B testing offering for feature toggles, I even tried my hand at building my own WordPress plugin back in 2018. But the thing that interests me most about GitLab offering is a combination of both configuration that doesn’t need a deployment to take effect, and also the proximity of the flags’ configuration to the development activities rather than another app.
What is a feature toggle?
At its most basic form a feature toggle is a boolean that tells an application to do one thing or another based on its value:
if(is_my_feature_enabled) {
  doTheThing();
} else {
  doTheOtherThing();
}
When you third party most providers this boolean variable becomes a function call to an SDK. For example this is how you check a feature flag with LaunchDarkly’s JS SDK:
// Skipping the LaunchDarkly SDK setup for `LDClient`
const flagValue = myLaunchDarklyClient.variation('YOUR_FEATURE_KEY', false);
The above checks with the vendor to see if YOUR_FEATURE_KEY is enabled for the current user and
will resolve to either true or false when this line of code is executed. An important note
is that feature toggles are typically run-time and not build time. This allows you to
toggle behavior without redeploying an application, or enabling a feature for a small subset
of users at a time, what is known as an activation strategy, which we will look at once our
React app is connected.
Working with GitLab
Behind the scenes GitLab uses Unleash which is an open source feature management solution, but how to we use GitLab’s feature toggles in a React app? There are three components we need to work on, these are:
- A GitLab project - Where we’re going to manage our feature flags
- A Proxy server - A secure way to communicate with our GitLab instance from the client
- A React app - Make changes to our React app to use these toggles
Our React app doesn’t communicate directly with the GitLab API, instead, we offer a dedicated proxy service secured by an authorisation secret to read the status of our feature flags. The React app then talks to the proxy that in tern communicates with our GitLab instance. Up first setting up our GitLab project…
Setting up our GitLab Project Feature toggles in the UI
We’re assuming you already have a GitLab repository/project (possibly home to your React app) that you want to use feature toggles with. If not you can register for a free account or checkout their pricing page. Once logged in to GitLab and while viewing your project (assuming you have the right permissions), under “Deployments” you should see an option titled Feature Flags.
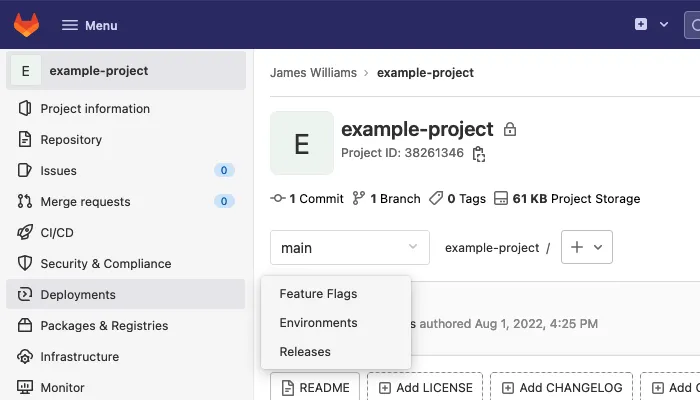
If you have access you should be presented with a page that looks like this:
![]()
Our first stop is to click on the Configure button in the top right to open the Configure feature flags dialog:
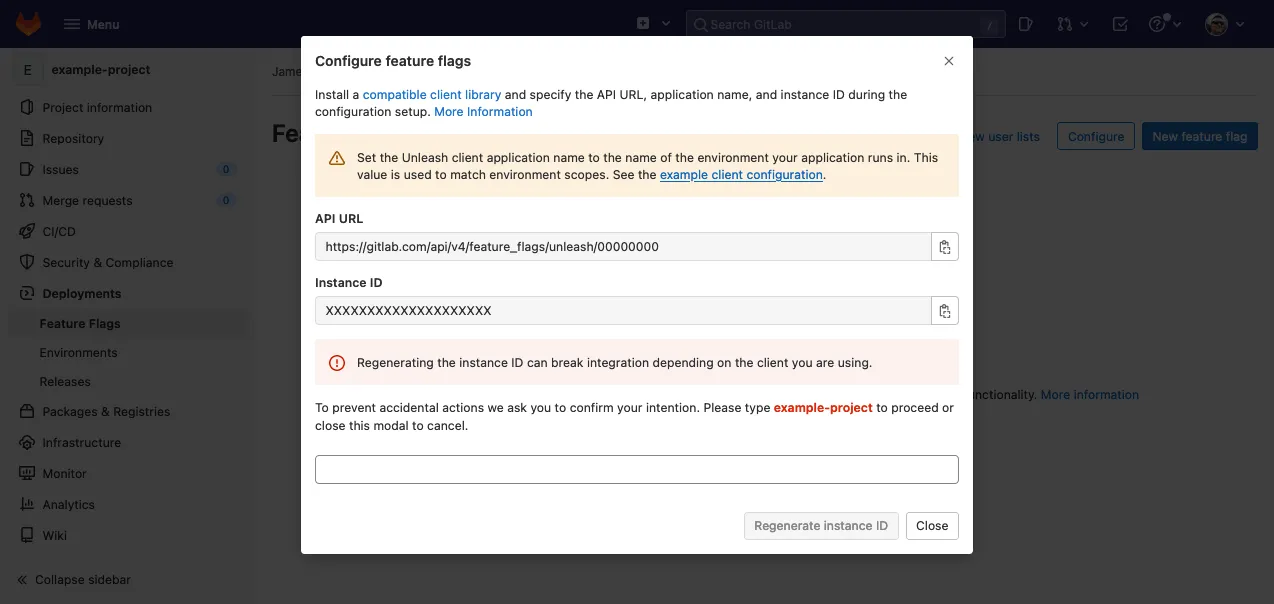
We don’t need to do anything other than save both the API URL and Instance ID values as we
will need these in a moment when we configure our proxy. One last bit of preparation work will
be to create a GitLab Access token.
GitLab Access Token
This token will be used by the proxy service to communicate with your GitLab instance on your behalf. For this I’d recommend you create a project access token instead of using a personal one, to restrict it to the project you’re working with. Save your token somewhere safe we will need it in a moment.
The proxy server
Now we have our API Token (your Gitlab Access token), our Instance ID and our API URL we’re
ready to configure our proxy service. The proxy application sits between GitLab and our React
app (the client), this structure provides some security and performance benefits as it doesn’t
expose direct access to GitLab ensuring the internal feature toggle configuration isn’t exposed
to the world!
Unleash does offer a free tier “hosted” option instead of having to run your own proxy which you can find details about on their pricing page which also allows you to skip the need for Gitlab too if you want.
sequenceDiagram
    participant client as React Client
    participant proxy as Proxy Server
    participant instance as GitLab Instance
    client-->>+proxy: Request flags (with access key)
    proxy-->>+instance: Request with GitLab Access token
    instance-->>-proxy: Return feature flags info
    proxy-->-client: Set flag status
For this example we’re going to use the Docker image Unleash provides and run the proxy locally. We can use the following docker run command to pass the required environment variables to the container.
docker run -d \
  -e UNLEASH_PROXY_SECRETS="RANDOM_STRING_9vZBzCd2jeqE7JY" \
  -e UNLEASH_URL="https://gitlab.com/api/v4/feature_flags/..." \
  -e UNLEASH_INSTANCE_ID="XXXXXXXXXXXXXXXXXXXX" \
  -e UNLEASH_API_TOKEN=${GITLAB_PROJECT_ACCESS_TOKEN} \
  -p 3000:3000 \
  unleashorg/unleash-proxy
Wait where did these values come from? Let’s recap what each of these variables is doing and where we got their values:
UNLEASH_PROXY_SECRETS- This is a randomly chosen secret is used in both the client and proxy, and is used to authorize calls to the proxy from the client app. This can be a comma separated list of secrets but in this example we’re passing a single stringRANDOM_STRING_9vZBzCd2jeqE7JY. Please use a sensible secret in production!UNLEASH_URL- This is our API URL from the GitLab configuration dialog.UNLEASH_INSTANCE_ID- This is theInstnce IDfrom the same configuration dialog.UNLEASH_API_TOKEN- This is our GitLab project access token (in this example I am passing in an exported variableGITLAB_PROJECT_ACCESS_TOKENto theDockerrun command.)
Only the UNLEASH_PROXY_SECRETS value is shared with the client app and you can find a more
detailed breakdown of the configuration details, their defaults and what they’re used for on
the Unleash proxy configuration documentation.
Once the container is running you can cURL the service to verify its connected successfully:
curl -H "Content-Type: application/json" \
     -H "Authorization: [One of your UNLEASH_PROXY_SECRETS values]" \
     -X GET \
     http://localhost:3000/proxy
If the proxy is working you can expect something like the following as a JSON response:
{
  "toggles": []
}
Connect the client to the proxy
Now we’ve got the proxy setup and have verified its connected, time for the React app. We’re going to use Create React App and the official Unleash React client for this, which we can install by running the following in our (assumed to be already set up) React project:
npm install @unleash/proxy-client-reactWith the client installed we can now adjust the app root to add
our context provider. With the Unleash
client we pass a config property, allowing it can connect to the proxy and ultimately out
GitLab instance. The following snippet shows how we’re doing this using environment variables.
We’re using create-react-app in the following example it will pull our
values from our .env file in the project’s root directory.
import { FlagProvider } from '@unleash/proxy-client-react';

// Pull our config variables from our .env file
const {
  REACT_APP_PROXY_URL,
  REACT_APP_PROXY_CLIENT_KEY,
  REACT_APP_PROXY_APP_NAME,
  REACT_APP_PROXY_ENVIRONMENT
} = process.env;

// Set your config
const config = {
  url: REACT_APP_PROXY_URL,
  clientKey: REACT_APP_PROXY_CLIENT_KEY,
  appName: REACT_APP_PROXY_APP_NAME,
  environment: REACT_APP_PROXY_ENVIRONMENT,
  refreshInterval: 300, // How often (in seconds) the client should poll thef proxy for updates.
};
// [...]

// In your root renderer:
root.render(
  <React.StrictMode>
    <FlagProvider config={config}>
      <App />
    </FlagProvider>
  </React.StrictMode>
);
You can find out more about the configuration options in the @unleash/proxy-client-react
library in the
React SDK Initialization docs.
Now we have the provider configured we can start making use of the feature toggles inside our application’s components. Here is a simple example that returns a paragraph tag with either the word “Enabled” or “Disabled” depending on the state of the toggle.
import { useFlag } from "@unleash/proxy-client-react";

export const ExampleComponent = () => {
  const exampleFlag = useFlag(`example_flag_key`);
  return <p>{ exampleFlag ? 'Enabled' : 'Disabled' }</p>
}
Running this you will see that example_flag_key is false. Which is correct as we have not
enabled a flag with that name, moreover we don’t even have a flag with that name. The useFlag
function will always return false if a flag is known and disabled, or unknown. To get this
component to show “Enabled” we’ll need to create, and activate the toggle.
Adding a feature toggle
Let’s add our flag and activate it to see this component go from “Disabled” to “Enabled”. Let us
head back to Gitlab and to you project’s “Feature Flags” dashboard (via Deployments / Feature Flags ) use the button
in the top right labeled “New Feature flag”, where you should be presented with a screen like this:
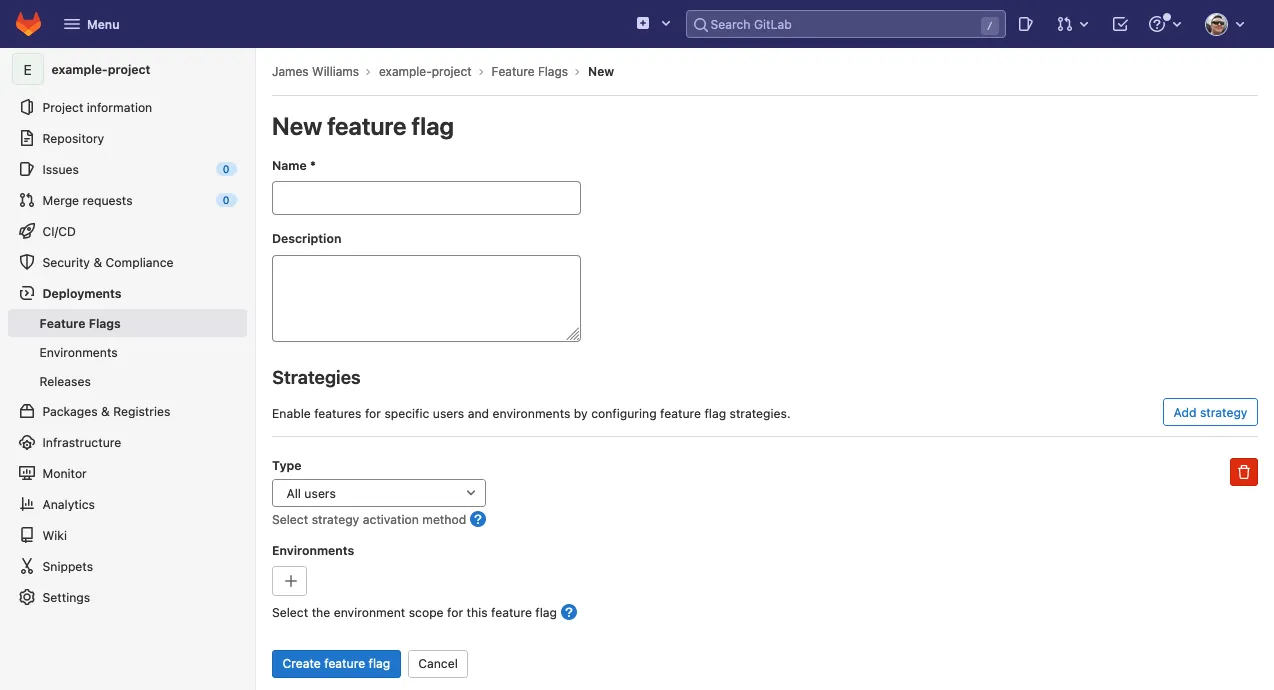
For the Name add example_flag_key or if you changed it add your flag’s name. You will have to
ensure is a valid “slug” format, the name can contain lowercase letters, digits, ”_” and ”-”.
Once you’ve added the name lets skip over the rest of the config and press “Create feature flag”.
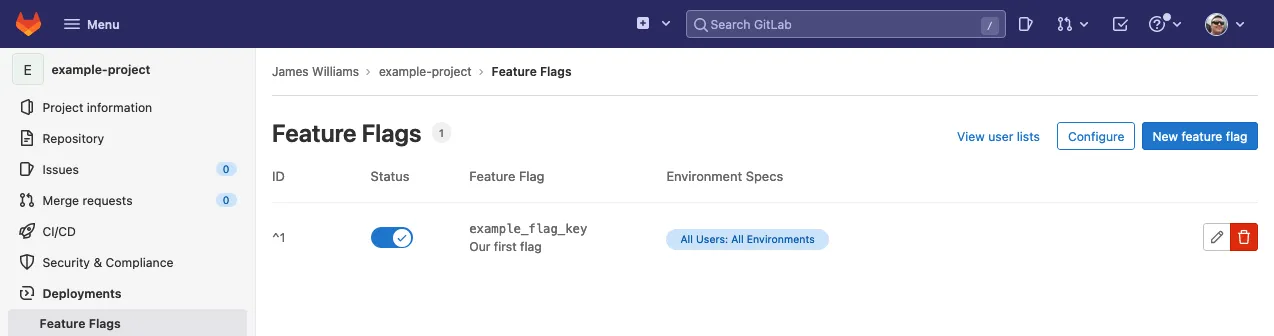
Once you create your flag you should be sent back to the list of flags with your new feature
toggle set to active by default. Now you can go back to your React app and once the
refreshInterval triggers a new fetch, the SDK should show your new flag as ‘Enabled’!
Activation strategies
Now we already know how to activate toggles for the app as a whole in the Gitlab admin. A more powerful feature of GitLab/Unleash comes in the form of activating features for specific users or enable it for a small group of users. Unleash call these “activation strategies” and offers four different ways to activate feature toggles these include:
Standard- Active for everyoneUserIDs- Active for users with a userId defined in the userIds listIPs- The remote address strategy activates a feature toggle for remote addresses defined in the IP list.Hostnames- The application hostname strategy activates a feature toggle for client instances with a hostName in the hostNames list.
Unleash does a much better job of detailing your options when it comes to activation strategies, I’d recommend checking out their Activation Strategies page.
An example using the UserId activation strategy
One of the activation strategies is using UserIDs. In the Gitlab UI we can target a specific
toggle to activate for specific values by configuring a User List and adding our newUserId
user ID to it. In the following example we’re updating the SDK to set the current userId to a
custom value which is included in our User List and once complete the toggle will activate.
import { useUnleashContext } from "@unleash/proxy-client-react";
import { ExampleComponent } from "../components/ExampleComponent.jsx"

export const UserActivation = () => {

  const updateContext = useUnleashContext();

  const setUserId = async (newUserIdValue) => {
    console.log(`Set userId to ${newUserIdValue}`);
    return updateContext({userId: newUserIdValue});
  }

  return (
    <div>
      <h1>Flag status for user: <ExampleComponent /></h1>
      <button onClick={() => setUserId('newUserId')}>Set</button>
    </div>
  )
}
Be sure to check out the Activation Strategies page on the Unleash documentation along with GitLab’s own docs for its feature toggle offering and the activation strategy that are supported out of the box.
With that we’ve now set up a React app to use a Gitlab feature flags!