MacOS: Creating a right click option to copy a file path
Sometimes you just really need a file path. You’ve got a file open in Finder, and you just need the path. Ideally without going through the usual drag-and-drop into Terminal and/or take note of the file location then cd your way back.
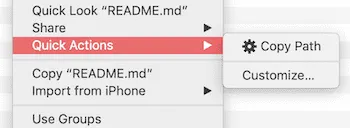 The goal. A right click context action copying the path of the selected file.
I initially thought of looking into writing a custom application that offers this functionality through the right click context menu but then I had a brain wave. “Hey there is a way to automate tasks on Mac, is there a way to do this via the right click context menu?” and it turns out there is!
I’ve written a quick guide on recreating this solution which you can find below, or you can download the workflow here.
Say hello to Automator.app
Automator is a drag-and-drop automation application that is bundled with MacOS to easily automate repetitive tasks such as renaming files or resizing images. It comes with a load of default actions and input blocks and can be extended to include your own AppleScripts if you need something more bespoke. We’re going to use Automator to “copy” our files for us, which will then give us the file path on the clipboard solving our problem.
Step 1 of 4
You’ll want to open the Automator.app - This is the little robot looking thing you will find in your applications folder.
Step 2 of 4
Once open, create a new project and select Quick Action. This project type is what makes the application appear in the right-hand context menu on your Mac.
Step 3 of 4
Now we’re ready to start configuring our new right click option. At the top of the main panel you’ll find some options. We want to change the “Workflow receives current” dropdown to select the “files and folders” options. Then select “Finder.app” in the following dropdown.
This second dropdown is a little like the context for the menu appearing, with this setting our new menu option will only appear in the Finder application. So your settings panel should look something like this once you’re done:

Step 4 of 4
Last but not least we need an action to be carried out as part of this Automator workflow. What we’ll want to do is search for the “Copy to Clipboard” action from the left-hand menu (make sure you’ve got the “Actions” button active and not variables).
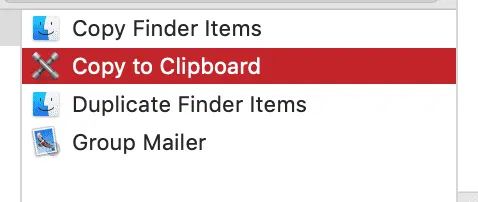
Once you’ve found it, drag it over to the space below the configuration panel from step 3. Once that is there we’re done. Save your application with a useful name as whatever name you put here will be what appears in the right click menu.
Closing
You should now have a working right click copy-path application running on your Mac! If not, and I’ve done a terrible job of explaining this and you can just download the complete workflow here.