
Salesforce Commerce Cloud - Display a React app as a page in business manager
Even with Salesforce Commerce Cloud being such a powerful platform sometimes you need to embed a custom app or experience right in the Business Manager. Say you have some custom feature or UI you need to add to business manager.
A business manager extension is a great way to do this. We can augment the typical Business Manager UI and serve even our own React apps.
Business Manager Extension cartridge
For things like this and custom attribute editors I recommend creating a separate dedicated Business Manager extension cartridge as part of your code.
This can be done using the Prophet debugger plugin for VSCode or by setting up the following scaffold file in the following directory structure:
app_custom_bm
 └─> cartridge
     └─> app_custom_bm.properties
Inside the app_custom_bm.properties file we add the following:
## cartridge.properties for cartridge app_custom_bm
#Mon Apr 29 19:46:1 CEST 2023
demandware.cartridges.app_custom_bm.multipleLanguageStorefront=true
demandware.cartridges.app_custom_bm.id=app_custom_bm
One final step is to ensure this cartridge is added to your sites’ Business Manager cartridge path
(not the site one). You can do this by going through Administration > Sites > Manage Sites and
under the heading “Business Manager Site” click the link that reads “Manage the Business Manager
site”.
Now add your cartridge ID, for our example that is app_custom_bm to the cartridge path like
you would for the sites, separating with a :.
Add a custom menu item
Now we have our cartridge lets get started by adding a menu item to get us started. For this example we are going to add a new menu group to the Merchant Tools menu however you can also add your pages as sub-menu items to any of the existing groups in either the Administration menu or Merchant Tools.
First off we need to create a new file in our business manager extension cartridge
called ./cartridge/bm_extensions.xml in which we are going to add the following:
<?xml version="1.0" encoding="ISO-8859-1" ?>
<extensions xmlns="http://www.demandware.com/xml/bmmodules/2007-12-11" xmlns:xsi="http://www.w3.org/2001/XMLSchema-instance" xsi:schemaLocation="http://www.demandware.com/xml/bmmodules/2007-12-11 bmext.xsd">
    <menuitem id="my-menu-item" position="1" site="true">
        <name xml:lang="x-default">Custom Menu Option</name>
        <short_description xml:lang="x-default">Custom Menu Item description</short_description>
        <description xml:lang="x-default">Custom Menu Item description</description>
        <icon>icons/logo.png</icon>
    </menuitem>
    <menuaction id="my-menu-second" menupath="my-menu-item" position="500" site="true">
        <name xml:lang="x-default">Custom App</name>
        <short_description xml:lang="x-default">A short description</short_description>
        <description xml:lang="x-default">A full description</description>
        <exec pipeline="Example" node="Start" />
        <sub-pipelines>
            <pipeline name="Example"/>
        </sub-pipelines>
        <icon>icons/logo.png</icon>
    </menuaction>
</extensions>
Note the <icon> set in the initial menu-item this correlates to the following path in your
cartridge: app_custom_bm/cartridge/static/default/icons/logo.png. After all that is uploaded we
should see a new menu option under our “Merchant Tools” menu.
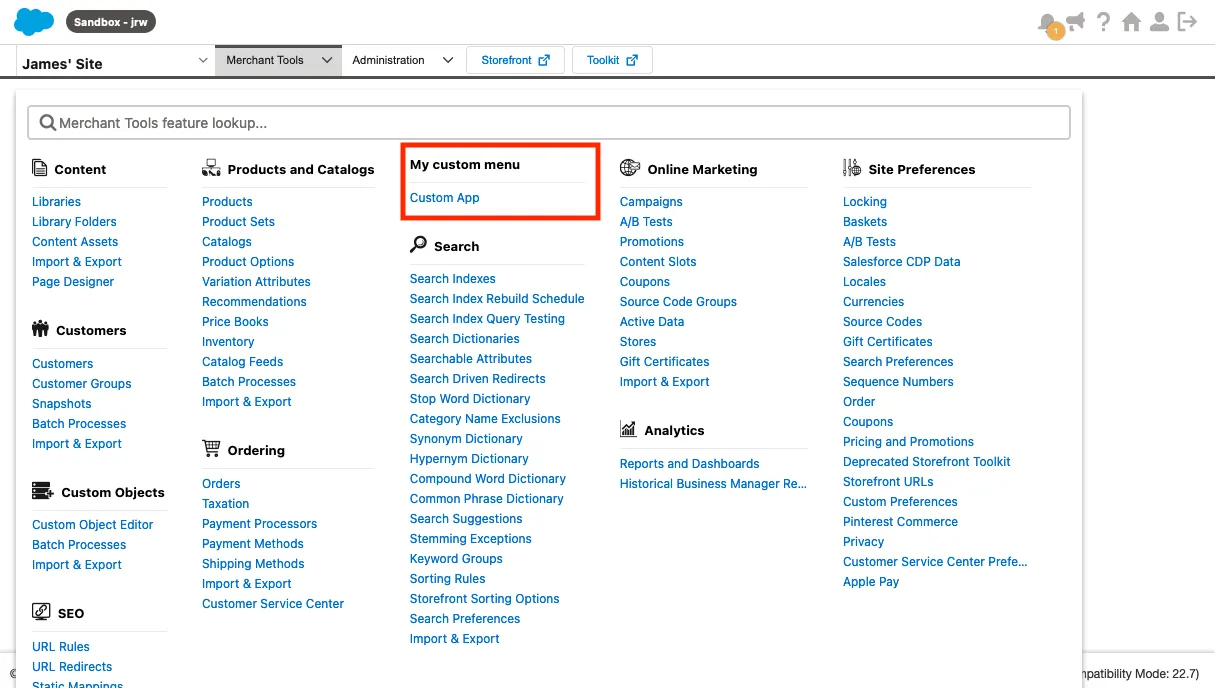
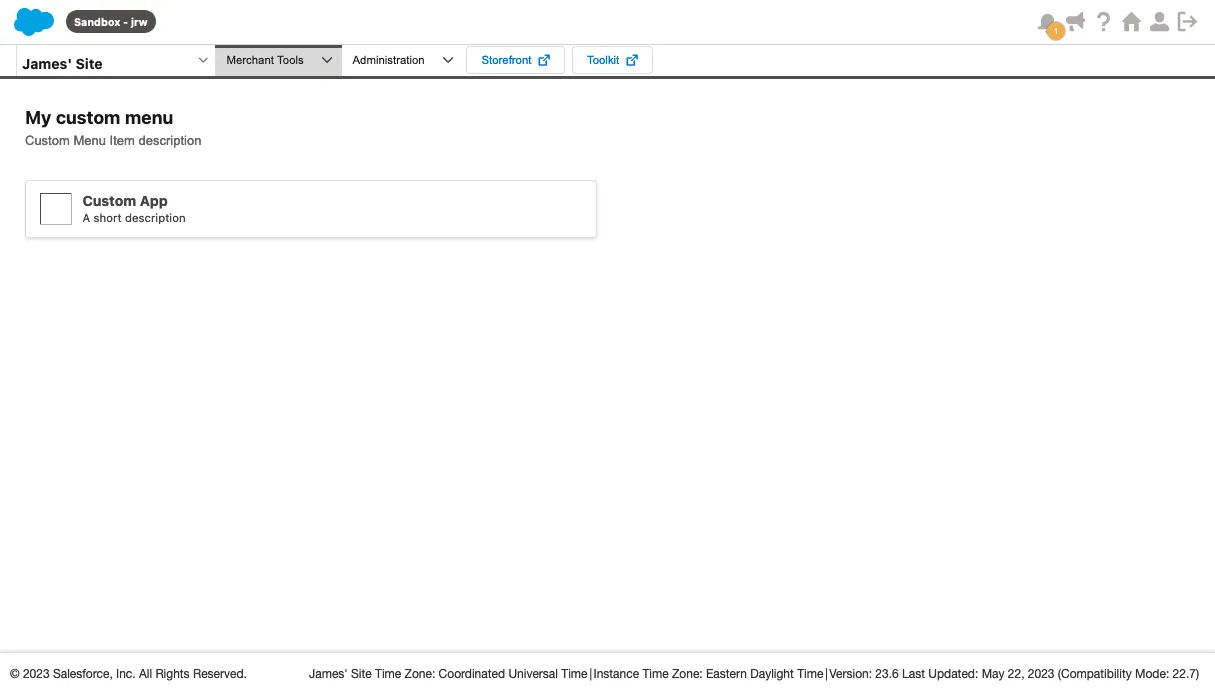
Then clicking on the Menu heading “my custom menu” will lead us to our menu page:
For more information on customisation options available for the Business Manager be sure to check out the SFCC docs site on how to Customize Business Manager.
Getting errors when clicking on menu links?
On occasion, you might get some various errors relating to missing config files in your logs when adding this extension. To get around that you may need to add a few config files to your cartridge. I’ve uploaded the required files to my sample repository on GitHub for the contents.
https://github.com/jamesrwilliams/sfcc-react-business-manager-extension
Onto the ISML
Now we have a menu item lets make it do something! You may have noticed that in
our bm_extension.xml file has that <exec /> node. This actually relates to our controller in
Example.js, the same way our public controllers work, with the pipeline being the filename, then
the node being the express-esc endpoint we define in said pipeline file.
Setup our controller
First step lets wire up our menu item to a controller endpoint that renders a ISML template. First
up lets create a real simple controller using the Example pipeline name from our XMl and the
node as Start like so:
const server = require("server");

server.use('Start', function (req, res, next) {
  res.render('core/home');
  next();
});

module.exports = server.exports();
Here we are getting SFCC to render the core/home ISML template so lets set that up next:
<isdecorate template="application/MenuFrame">
<iscontent type="text/html" charset="UTF-8">
  <h1>A custom app</h1>
</isdecorate>
This is a super lightweight ISML template which references another MenuFrame file, which we will
set-up to make it easier for future pages to be added also, so in application/MenuFrame.isml we
add the following:
<iscontent type="text/html" charset="UTF-8" compact="true">
<isinclude url="${URLUtils.url('SiteNavigationBar-IncludeFrameTop','SelectedMenuItem',pdict.SelectedMenuItem,'CurrentMenuItemId',pdict.CurrentMenuItemId)}">

<isreplace/>

<isinclude url="${URLUtils.url('SiteNavigationBar-IncludeFrameBottom')}">
Here you can see we’re using a few other ISML tags the isinclude adding the normal
Business Manager navigation header and footer to our page allowing our UI to fit in to the site.
Along with that we’re using the isreplace which is where the content between the isdecorate from
our home.isml file.
Inject react
As for most of the things I’ve done with react apps in Commerce Cloud we are going to assume that we already have a React app ready to go and luckily for us this is a super simple final step.
Once you have a built your React app you can upload the build files to the static directory in the
cartridge, I normally keep all the React apps in an /apps/ directory within the static folder to
keep things organised. Once the build files are uploaded, we can make some minor changes to
our home.isml template, and we’re finished:
<isdecorate template="application/MenuFrame">
<iscontent type="text/html" charset="UTF-8">
    <link href="${URLUtils.staticURL('/apps/bm_app/styles.css')}" rel="stylesheet" />
    <div id="root"></div>
    <script defer src="${URLUtils.absStatic('/apps/bm_app/runtime.js')}" type="module"></script>
    <script defer src="${URLUtils.absStatic('/apps/bm_app/polyfills.js')}" type="module"></script>
    <script defer src="${URLUtils.absStatic('/apps/bm_app/vendor.js')}" type="module"></script>
    <script defer src="${URLUtils.absStatic('/apps/bm_app/main.js')}" type="module"></script>
</isdecorate>
Update Business Manager permissions
Business Manager extension not showing up in your menu? Be sure to check if your user role has the
correct permissions to view these custom menu items. You can adjust their visibility for various
roles using the Administration > Organization > Roles > Administrator - Business Manager Modules
section of Business Manager. And then ensuring your “Module” is enabled.
Review
To recap we’ve set up a new cartridge, followed by a Business Manager extension XML file to register a new menu and menu item to. Then added a corresponding controller and ISML templates for those menu items. Then our final step was to add a React app to this extension page.
A full copy of the code used here is available in my sample repository on GitHub: https://github.com/jamesrwilliams/sfcc-react-business-manager-extension