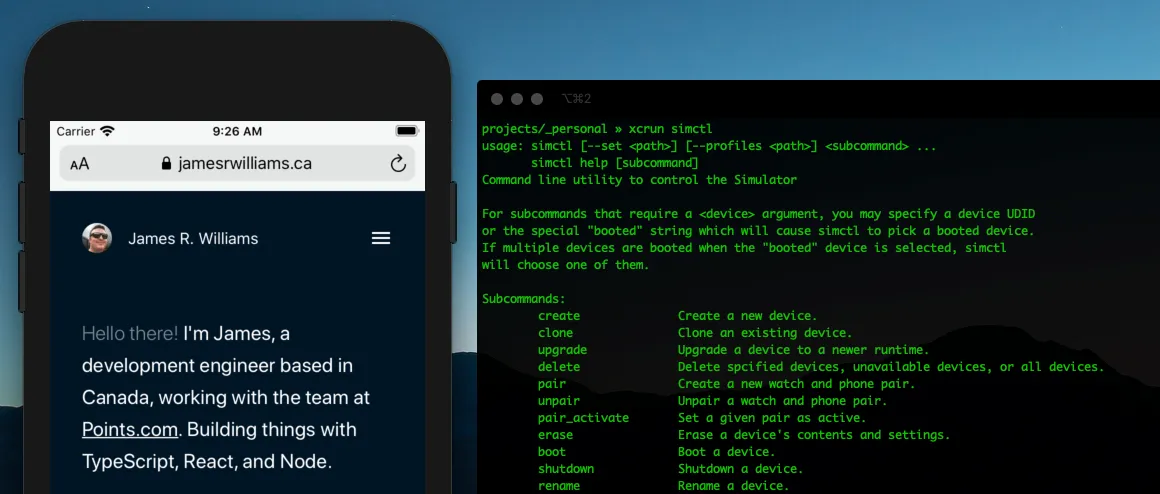
The Apple development application Xcode comes with a nifty iOS simulator bundled with it. Most of the time you probably use this for app development activities, but you can also test web things in a native Safari environment without using things like BrowserStack or SauceLabs. While you can use the simulator via the UI, a lot of functionality can be controlled from the command line interface using xcrun simctl. You don’t even need an Apple Developer Program membership to use Xcode or the simulator.

Downloading the simulator
As the simulator is bundled with Xcode we need to download that to use it, and sadly it’s around 11 GB in size. Visit the Xcode page on the Apple website to download, or search for Xcode in the Mac App Store on your desktop device. Once downloaded open the app and follow any setup instructions. You can then launch the Simulator.app by searching for it in Spotlight, or by opening Xcode, then while on the splash screen, clicking on the menu bar in the top left:
Xcode → Open Developer Tool → Simulator.
This will start the application with a default device emulator that you can interact with using your mouse and keyboard. checkout the app’s menus for the myriad of features and events you can trigger.
How it works
The application works by creating simulators that are a combination of both a ‘device type’ and a ‘runtime’. A device type is the hardware that will be simulated, and the runtime is the software version (like WatchOS v3 vs v3.2). The simulator comes with a number of simulators ready to go, you can find these by running:
xcrun simctl list
Which will display a list of all the runtimes and devices you have set up on your machine, and they will look something like this:
== Devices ==
-- iOS 13.3 --
  iPhone 5 (D1F67F00-FA3D-42B7-9E2F-FEF23809D4A0) (Booted)
  iPhone 8 (93E8CDD7-BFC4-4298-BD9D-18C87B7872C9) (Shutdown)
  iPhone 11 (18064F70-56D5-4153-83C6-E6CB3567B258) (Shutdown)
This format follows the <Device Type> (<UID>) (<STATUS>). To start a simulator from one of these pre-defined devices you can run:
xcrun simctl boot <UID>
Make sure you use a UID from the == Devices == section, as the previous sections are just device types and runtimes.
Creating a new device
To create a new device you can use the xcrun simctl create command. Say I need an 13.3 runtime on iPhone 8 to test my software. You provide simctl with the reverse-domain specifiers for each. Like so:
xcrun simctl create <name> <device type id> <runtime id>Here is the same setup but with the real values:
xcrun simctl create MyPersonalSim com.apple.CoreSimulator.SimDeviceType.iPhone-8 com.apple.CoreSimulator.SimRuntime.iOS-13-3Once you run this it will return to you a UID for your simulator. They start in a shutdown state, next we need to boot the simulator in order to use it. We can do this by running:
xcrun simctl boot MyPersonalSimSee how we’re using the name argument from when we created the simulator, you can boot a simulator using its UID also. Now we have an active simulator, we can control it.
You can also use the booted keyword instead of the UID or name once the simulator is running. If you do have more than one simulator open at a time, the command will be used on all open simulators that allow that action.
Opening a URL
Use the openurl function to open that URL on the provided simulator.
xcrun simctl openurl booted https://jamesrwilliams.caTaking a screenshot
xcrun simctl io booted screenshot ~/Desktop/screenshot.pngRecording a video
You can also record device videos directly from the simulator, and can interact with it while its recording. You will need to kill the script with control + c to stop recording.
xcrun simctl io booted recordVideo ~/Desktop/video.mp4Bonus
Alias for xcrun simctl
I’ve got an alias setup on my machine for using the simulator in fewer keystrokes. You can do the same by adding something like this to your ~/.bash_profile or equivalent alias location you’re using (mine is ~/.zshrc). Here I’m aliasing iosem (ios emulator) to xcrun simctl:
alias iosem="xcrun simctl"Opening the simulator
A helpful one liner to open the simulator application as I am unaware of a way to open these from the command line.
open /Applications/Xcode.app/Contents/Developer/Applications/Simulator.app/Remove un-needed simulators
Delete simulators that are no longer usable.
xcrun simctl delete unavailable